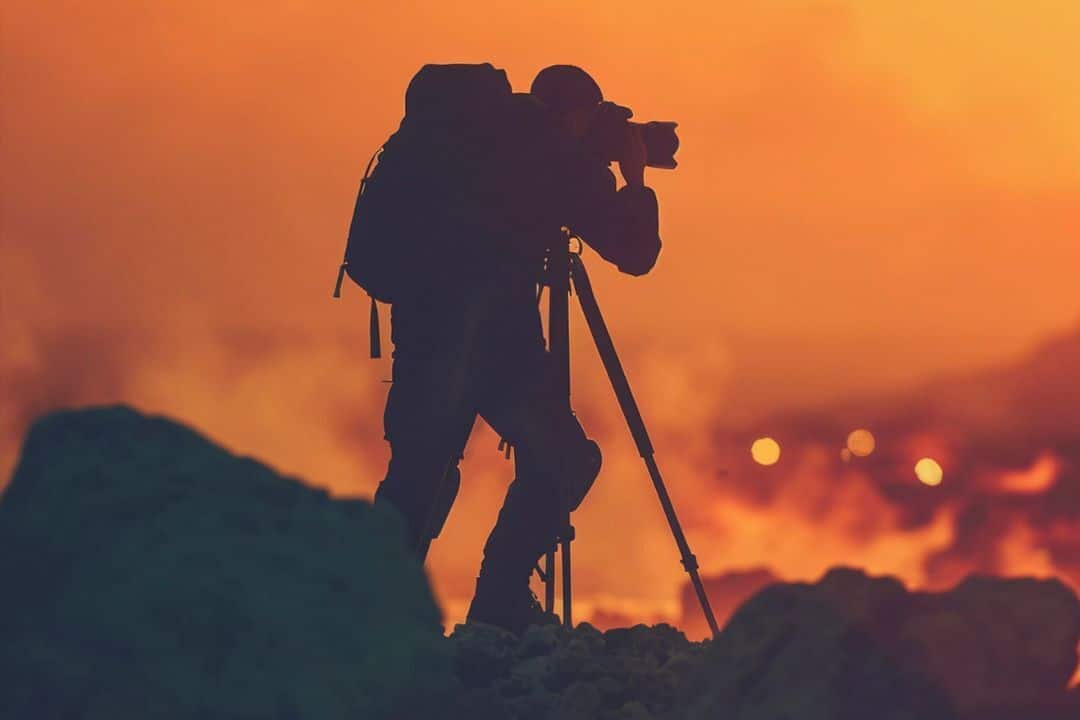
How to make your camera work for you at night, as told by a professional sports photographer.
For many people, photography is all about getting the sharpest, crispest, cleanest photo under any circumstances. While that is a very broad definition, it’s not entirely wrong. Oftentimes, we do strive to freeze a moment in time just to print it on a shiny piece of paper and show it to others. In other words, we make it our goal to recreate reality in a virtual realm, on a screen.
A perfectly staged frame can make that a lot easier. If you can get your models to stand still, the sun to shine just right, and the wind to blow at a certain speed, that goal becomes very achievable. At the end of the day, it is the circumstances of the shoot that can make it infinitely easy or difficult to capture moments using your camera. As such, shooting at night can be a challenge for beginner photographers. To put it simply, the goal of night photography is to capture a photo that is as well-lit as you’d like it to be. You’re trying to attract as much light as possible, be it through your camera settings or external equipment.
Luckily, camera settings, photography equipment, and different lenses were all made to help you. If you know anything about photography, you know that tweaking the settings can increase the brightness, using a stabilizer can prevent motion blur, and the right lens can do wonders. Here are some things you need to pay attention to in order to secure a successful night shoot:
Camera settings
When you hear a photographer talking about camera settings, more often than not they are referring to shutter speed, ISO, and aperture.You don’t always need to regulate all three. When you’re shooting in a well-lit environment, you can focus on making sure the shots come out looking sharp and precise without worrying too much about the brightness of image. Night photography is very different.
For starters, you need to use a low shutter speed. That is required because of the lack of natural light in your environment. You need to keep your shutter open for as long as 10 seconds per shot to capture as much light as possible. In the opposite case, your photo is going to end up looking very dark. Depending on the amount of light present in the frame, it could be as dark as a black rectangle.
We’ve already established that one of your main goals as a photographer at night is to find new sources of light. A wider aperture, much like a slower shutter speed, can help you obtain more light. Keep in mind that a wide aperture will result in a shallow depth of field. If you need the background to appear sharp, you can make the aperture smaller. Play with the setting to find the perfect balance.
When it comes to ISO, you will want to stick to our rule of thumb and keep it low. It might be your first instinct to go for a higher ISO. Fight that instinct and do your best to lower it as much as possible. To be more precise, 100 is the magic number. If your ISO is just a bit too high, it can make the photo look grainy and unappealing. Remember that we’re trying to keep it sharp.
Equipment
One of the biggest downsides of using a slow shutter speed is motion blur. When your shutter speed is low, you simply cannot afford to hold the camera. Even if your hands shake ever so slightly, the photo will end up blurry. You can prevent that with the help of some handy equipment.
Unless you’re a heart surgeon, you will probably have a hard time holding a camera in the air perfectly still for at least 10 seconds. Luckily, you don’t have to. You can just use a tripod. Prop your camera up, find the right angle, and photograph away. It will help you keep the motion blur to a minimum. Keep in mind that your external environment is not always going to be in your control. If you place your tripod on a busy street, it might vibrate as a result of cars driving by or heavy foot traffic. Do your best to find a place that will not be affected by such factors.
Unfortunately, even when your camera is propped up on a tripod, you can still get some motion blur from pressing the shutter release button. To prevent that, you can use a remote shutter release. It is a remote button that will initiate the photograph without forcing you to actually touch the camera. Alternatively, you can set up your perfect shot and turn on a timer on your camera.
If the setting you’re in has some glaring lights, like street lamps, for example, it can result in lens flare. You can combat this issue by using a lens hood. It will block out the unwanted light and help you focus on the subject of the photo.
Artificial light
Depending on the effect you’re looking for, shooting with barely any light might be perfect. However, if you want to get a fairly sharp image, you might want to consider using artificial light to brighten up your photo. Working with artificial light can be tricky, especially for a beginner. Try not to point the light directly at your subject. Instead, illuminate their surroundings to make it look more natural.
Artificial light can give you more freedom in regards to your camera settings. If you have a light source, you can use a slightly quicker shutter speed and make your aperture smaller. That will allow for higher focus and sharpness. Play with the light and adjust your settings accordingly.
Final words
In night photography, you need to focus on two things: finding a source of light and keeping your photos sharp. These two are difficult to accomplish at the same time, but it’s not impossible. You need to get comfortable with your camera settings, and then you need to get acquainted with your environment. With these two under control, you can make beautiful shots at night.